Introducing OpenLaszlo
October 11, 2006
Introduction
This tutorial helps you get started on OpenLaszlo, which is an open source platform for creating zero-install web applications with the user-interface capabilities of desktop client software. OpenLaszlo programs are written in XML and JavaScript and transparently compiled to Flash. It is "write once, run everywhere." An OpenLaszlo application developed on one machine will run on all leading web browsers and on all leading desktop operating systems. Applications made on OpenLaszlo can also run in solo mode as a desktop client. You can learn more about OpenLaszlo here.
This article refers only to open source tools to set up a development environment for Laszlo. This is the actual setup I developed to start up on a personal project. Every step is narrated and illustrated with screenshots.
The tutorial also helps you to set up the environment with "IDE for Laszlo," an open source plugin available for Eclipse that offers very convenient features but uses Apache Ant for actual deployment. The goal is to reduce the building and deployment time while developing with OpenLaszlo.
The recommendation to use Ant for deployment is due to its simplicity and quick execution time. In comparison, the IDE for Laszlo plugin is slow. Besides, Ant can provide additional features such as automated testing, reporting, web application deployment, etc.
Application development using OpenLaszlo, however, is not within the scope of this tutorial. For more details on OpenLaszlo architecture, syntax, and tutorials, please refer to the documentation at the Laszlo website.
Download the Required Software
The following software is required to try out the different steps in the tutorial. You can download them at their respective locations, linked below.
-
Get the latest jdk 1.5.0_02 https://java.sun.com
-
OpenLaszlo 3.2 http://download.openlaszlo.org/3.2/openlaszlo-3.2-windows-dev-install.exe
-
My Eclipse with the Web Tools Platform http://www.eclipse.org/downloads/download.php?file=/webtools/downloads/drops/S-1.0RC5-200512160606/wtp-1.0RC5.zip
-
Apache Ant 1.6.5 http://apache.us.lucid.dk/ant/binaries/apache-ant-1.6.5-bin.zip
-
Laszlo Ide for Eclipse http://openlaszlo.org/download-old/ide/laszloIDE-0.2.0-jdk1.5.zip
Make sure that your downloaded software is the same version mentioned in the steps, since the tutorial has been designed and tested only with this software.
Install the Software
Create a folder, Tools, in C:\ and install the following software. A
common location will ensure better traceability since we may want to examine deployment
folders often.
-
Jdk 1.5.0_02 to C:\jdk1.5.0_02
-
Open Laszlo 3.2 to C:\Tools\OpenLaszlo Server 3.2
-
Eclipse to C:\Tools\eclipse
-
Apache Ant 1.6.5 to C:\Tools\ant-1.6.5.

Figure 1. The C:\Tools folder with the required software installed
Follow the installation program wizard to install Jdk as well as the OpenLaszlo server. Eclipse and Ant can be extracted to their respective folders; they do not require an installation.
Installing Laszlo Plugin for Eclipse
IDE for Laszlo is an add-on to Eclipse providing a workbench that helps us to create, edit, debug, and test lzx files. Since many of its features are pretty useful, let's look at how to integrate this to our Eclipse instance.
-
Launch the Eclipse IDE. In the workspace folder, enter C:\laszlosetup. This could be any location; however, if a different path is used, make sure that this is reflected wherever it is referred to in the tutorial.

Figure 2. Select the workspace in Eclipse.
-
Now, Select Help >> Software Updates >> Find and Install.

Figure 3. The plugin install window in Eclipse
-
Select "Search for new features to install" from the next window.

Figure 4. Search for new features to install.
-
In the next window, select "New Archived Site" and browse to the laszloIDE-0.2.0-jdk1.5.zip.
-
Check laszloIDE-0.2.0-jdk1.5.zip.
-
Leave "Ignore features not applicable..." checkbox selected and press Finish.

Figure 5. Select the update sites.
-
After a confirmation screen, the plugin will be installed to your Eclipse development environment. We have set up our development environment!
Set the Environment Variables
The following are the only environment variables that need to be set:
-
JAVA_HOME - C:\jdk1.5.0_02
-
ANT_HOME - C:\Tools\ant-1.6.5
Set Up the Projects in Eclipse
The First Laszlo Project:
-
Select File >> New >> Project.

Figure 6. The Laszlo Select Wizard page
-
Select Laszlo Project and click Next.
-
Enter the project name as "laszlotutorial" and click Next.

Figure 7. The New Laszlo Project wizard
-
When asked "Open associated perspective?", say "Yes," and the Laszlo perspective will be enabled for the current workspace.
Create helloworld.lzx
-
Right-click the src folder in the Laszlo project, select New > Other … and select Laszlo File.
-
Click Next.
-
Enter the name as helloworld.lzx, and press Finish. The values against Container and File type may be left for their default values. This will typically appear as in Figure 8.

Figure 8. Naming the Laszlo file
-
Click Finish and the helloworld.lzx will be opened in the Laszlo editor for any update. Refer to Figure 9 for the view of the entire workbench.

Figure 9. helloworld.lzx in the Laszlo perspective (Click image for full-size.)
In Laszlo perspective, the numbered windows illustrated in Figure 9 provide the following features.
-
Script Explorer lets you view the content of the Laszlo project, including the class libraries available with Laszlo.
-
This is the Laszlo editor, the actual text editor for Laszlo. The editor also helps to structure the code and to provide content assistance. With the cursor positioned at a node, pressing
Ctrl-spacebar will pop up the options allowable at that point. -
The editor also provides for Source and Design view to enable visual editing.
-
Along with the design view in the editor, the Component Palette helps visual drag and drop of Laszlo components to the canvas.
-
The Outline view represents the Laszlo file as a hierarchy of nodes, as in an XML structure. Right-clicking the node enables the option to add attributes or child nodes.
-
The Attributes window lets you set the value of each attribute selected either in the text editor or the outline view.
Modify helloworld.lzx
Now, let's add some content -- say, a simple "Hello World" -- to the helloworld.lzx file so that we can view this in the browser. This is a very simple window: 250 pixels wide and 150 pixels high with a "Hello World" message. Copy and paste the code snippet below to the helloworld.lzx file.
Listing 1. helloworld.lzx
<canvas width="800" height="600">

<window name="mainwindow" width="250" height="150" title="Hello

World!">

<simplelayout axis="y" spacing="10"/>

<text text="Hello World" fontsize="14" fontstyle="bold" />

</window>

</canvas>
Deploy helloworld.lzx
Deploying an .lzx file is the process of publishing the file on the LPS (Laszlo Presentation Server), where it will be compiled. Once deployed, any standard web browser will be able to access this from the server.
The Laszlo IDE provides a facility to deploy a file from the Laszlo perspective. This requires creating a launch configuration from the Run configuration window. To make a launch configuration, go to menu bar, Run >> Run.
-
In the Run configuration window, select Laszlo Application, click New..., and name the new configuration on the right window (laszlotutorial_config), as shown in Figure 10.
-
Select the Project button and browse to the Laszlo project in the workspace.
-
Select the radio button corresponding to the Project file and browse to select helloworld.lzx from the workspace.

Figure 10. Run configuration window
-
Fill the common tab with the information in Figure 11, and click Run.

Figure 11. Run configuration window (common tab)
-
The helloworld.lzx will be deployed on the Laszlo Presentation Server, and the Hello World window will be displayed in the default browser, as shown in Figure 12. (You'll notice that this process is a little slow. In the subsequent section, we'll see how Ant can speed up the whole process in a real situation.)

Figure 12. Hello World in the browser
A Quick Look At Laszlo Web-Application Architecture
We'll take a look at the basic architecture of an OpenLaszlo-based web application from a configuration perspective. An in-depth discussion is beyond the scope of the present article, but is provided in the Laszlo Developer's Guide, available here.
Role of the Laszlo Presentation Server (LPS)
The Laszlo Presentation Server houses the Laszlo application that communicates with the client (browser). In terms of tiered web-application architecture, LPS is responsible for creating the view (presentation). The Laszlo files are compiled at the server and downloaded to the client as .swf files to be rendered by the Flash plugin in the browser. However, the data transported to the view is in XML format.
Role of the Tomcat (Servlet Container)
The application server houses the web application that executes business logic and communicates with the LPS. The Laszlo installation package is bundled with a Tomcat 5.0 server preconfigured with the LPS server. It is convenient for development purposes.
Now, we need to create the web application and deploy it to the Tomcat server. This is nothing but a jsp file that returns one single message: "Hello World from the Server!!" to our helloworld.lzx. This basic application will also help us validate the current deployment configuration.
First of all, from the current Laszlo perspective, update helloworld.lzx with the following:
Listing 2. helloworld.lzx
<canvas width="800" height="600">

<dataset name="hw_dset" src="/2006/10/11/graphics/http://localhost:8080/laszlotutorial/message.jsp" type="http" request="true"/>

<window name="mainwindow" width="250" height="150" title="Hello World">

<simplelayout axis="y" spacing="10"/>

<text text="Hello World" fontsize="14" fontstyle="bold" />

<text width="250" datapath="hw_dset:/laszlotutorial/message/@text" fontsize="10" fontstyle="bold" />

</window>

</canvas>
The above file is not much different from the first helloworld.lzx we created earlier, except for the following:
-
We have created a data source for the XML data that the application layer will provide.
-
The
srcattribute of the dataset must point to the URL of the jsp or the controller in the application layer. -
The type denotes the type of request sent to the server.
-
The Boolean value for the request tells LPS whether the data should be accessed immediately when the dataset is instantiated, or whether data will be required only during runtime while it is explicitly requested. In the latter case, the
requestattribute should be set tofalse, meaning "the data is not requested when the dataset object is instantiated," and the request for data is deferred at the time of instantiation.
With this, we have integrated the Laszlo code to accept dynamic data from the application layer.
Creating the Java Web Project
-
Select File >> New… >> Project >> and in the wizard box, select Dynamic Web Project and click Next.
-
Enter the name of the project as "laszloweb".
-
Select default entries for the other items and click Finish.

Figure 13. The New Dynamic Web Project wizard
-
When asked "Open Associated Perspective dialog box?", click yes.
-
This editor opens up with the J2EE perspective.
-
For convenience, you can hide the irrelevant folders by configuring the Working Sets in Eclipse. The Project Explorer finally looks like Figure 14.

Figure 14. The Project Explorer with the Laszlo and Laszlo web projects
-
Right-click the Web Content folder in laszloweb project, and select New... >> JSP.
-
Give the name as message.jsp and click Finish.
-
Copy and paste the following code snippet to message.jsp.
-
This just sets the
contentTypeof the jsp to XML and ensures that well-formed XML is returned to the client.
Listing 3. message.jsp
<%@ page contentType="text/xml" %>

<laszlotutorial>

<message text="Hello World from the server!!"/>

</laszlotutorial>
Configuring Ant To Deploy Laszlo and Web Applications
-
We'll create two files for this purpose: one build.xml that is the Ant script file, and the supplementary build.properties file that holds variables for configuration control.
-
Copy the following build.xml to the root folder of the web project.
Listing 4. build.xml
<!-- Master build-script for Laszlo tutorial Application. @author: Sreekumar.pillai@hotmail.com -->


<project name="laszlotutorial" default="compile" basedir=".">

<property file="build.properties" />

<!--classpath for ant -->

<path id="classpath">

<fileset dir="${tomcat-home}/server/lib" includes="*.jar" />

<fileset dir="${tomcat-home}/common/lib" includes="*.jar" />

</path>


<!-- Create a time stamp. -->


<target name="timestamp">

<tstamp>

<format property="build.time" pattern="MMMM d, yyyy hh:mm:ss z" />

</tstamp>

<echo message="Beginning build: ${build.time}" />

<echo message="Web app source: ${webapp.src}" />

<echo message="Java home: ${java.home}" />

<echo message="Java version: ${ant.java.version}" />

<echo message="Ant version: ${ant.version}" />

</target>


<!-- Initialization creates the dist and deploys directories. -->

<target name="init">

<mkdir dir="${classes.dir}"/>

<mkdir dir="${dist.dir}"/>

<mkdir dir="${laszlo.deploy.dir}" />

</target>


<!-- Compile all source files to the classes folder. -->


<target name="compile">

<echo message="Compiling the java source files" />

<javac destdir="${build.dir}/classes" debug="on" optimize="on">

<src path="${java.base}" />

<classpath>

<path refid="classpath" />

<pathelement location="" />

</classpath>

</javac>

</target>


<!-- Deploys the Laszlo project to the Laszlo Presentation Server. -->


<target name="deploy-laszlo" depends="init">

<!-- Make an application folder in the project folder -->

<echo message="Deploying to Laszlo application to lps 3.2" />

<copy todir="${laszlo.deploy.dir}" overwrite="true" >

<fileset dir="${laszlo.basedir}/src" />

</copy>

</target>


<!-- Deploys the web application on the default Tomcat server. -->


<target name="deploy-web" depends="war">

<echo message="Deploying the web application to the tomcat server" />

<copy todir="${tomcat.webapps}" overwrite="true">

<fileset file="${dist.dir}/${war.name}.war" />

</copy>

<unwar overwrite="true" src="/2006/10/11/graphics/${tomcat.webapps}/${war.name}.war" dest="${tomcat.webapps}/${war.name}" />

</target>


<!-- Deploys both web and Laszlo applications. -->


<target name="deploy-all" depends="deploy-laszlo,deploy-web">

</target>


<!-- Archives java class files into laszlojava.jar file. -->


<target name="jar" depends="compile">

<echo message="Archiving the java classes into .jar" />

<jar basedir="${classes.dir}" file="${webinf}/lib/${java.project.name}.jar" />

</target>


<!-- Creates the laszlotutorial.war. -->


<target name="war" depends="jar">

<echo message="Generating the .war file" />


<!-- Create the .war file for deployment. -->


<war basedir="${webapp.src}" manifest="${webapp.src}/META-INF/MANIFEST.MF" warfile="${dist.dir}/${war.name}.war" webxml="${webinf}/web.xml">

</war>

</target>

</project>
-
The build.properties should also go along with the build.xml to the root folder of the web project.
Listing 5. build.properties
# Base directories

laszlo.basedir=C:/laszlosetup/laszlotutorial

laszlo.src=${laszlo.basedir}/src


# Web Application folders

webapp.basedir= C:/laszlosetup/laszloweb


# Web application properties

war.name=laszlotutorial

webapp.src=${webapp.basedir}/WebContent

webinf=${webapp.src}/WEB-INF

build.dir=${webapp.basedir}/build

dist.dir=${webapp.basedir}/dist

classes.dir=${build.dir}/classes

javac.debug=true

junit.fork=true

compile.deprecation=true


# name of the laszlo application

laszloapp.name=laszlotutorial.


# 2 Java application properties

java.base=${webapp.basedir}/src

java.project.name=laszlojava


# deployment directories

laszlo.deploy.dir=C:/Tools/OpenLaszlo Server 3.2/Server/lps-3.2/laszlotutorial

tomcat.webapps=C:/Tools/OpenLaszlo Server 3.2/Server/tomcat-5.0.24/webapps

tomcat-home=C:/Tools/OpenLaszlo Server 3.2/Server/tomcat-5.0.24
Enable the Ant View of build.xml:
-
Go to window >> Show View >> Other... and in the Show View, select Ant.

Figure 15. build.xml in the Ant view
-
In the Ant view, click the "Add Build files" (the button with the ant icon) and select the build.xml file.
-
The Ant view should now display the ant targets in the build.xml file.

Figure 16. Targets in build.xml
Deploy the Applications
-
Double-click the deploy-all target, and both Laszlo and the web application are deployed to their locations on the respective servers.
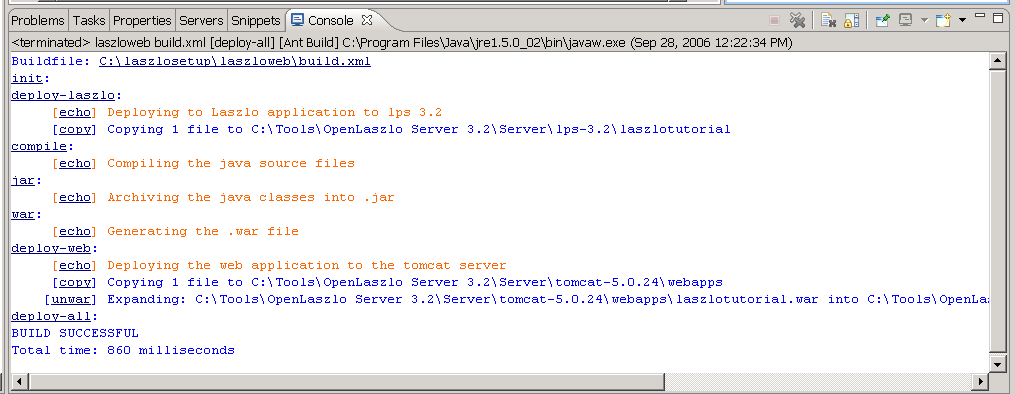
Figure 17. The console after running the deploy-all target (Click image for
full-size.)
-
Open a browser instance and enter the following URL: http://localhost:8080/lps-3.2/laszlotutorial/helloworld.lzx. The window should be displayed with the message from the server.

Figure 18. The "Hello World from the Server!!" in the browser
Runtime Compilation
The Laszlo Presentation Server has an inbuilt caching mechanism to speed up delivery of compiled code to the client. When the server is started, the cache is rebuilt. During the development phase, the server seldom needs to be restarted since the default setting is for changed files to be recached.
In the current setup we have built, only a refresh is required for the changes to be reflected in the browser. Restarting the server is necessary only when there is a change in the configuration files. As such, the whole process of deploying and refreshing the view for a typical .lzx file should not take more than three seconds unless slowed down because of data fetching from the application layer.
Conclusion
Setting up the development environment could be a daunting task, especially when the technology is new. This article has focused primarily on using open source tools to set up a platform for developing a Laszlo/Java web application. I am sure this tutorial can help readers to a quick start with Laszlo development.