An Introduction to Scalable Vector Graphics
March 21, 2001
If you're a web designer who's worked with graphics, you may have heard of Scalable Vector Graphics (SVG). You may even have downloaded a plug-in to view SVG files in your browser. The first and most important thing to know about SVG is that it isn't a proprietary format. On the contrary, it's an XML language that describes two-dimensional graphics. SVG is an open standard, proposed by the W3C:
SVG is a language for describing two-dimensional graphics in XML. SVG allows for three types of graphic objects: vector graphic shapes (e.g., paths consisting of straight lines and curves), images and text. Graphical objects can be grouped, styled, transformed and composited into previously rendered objects. The feature set includes nested transformations, clipping paths, alpha masks, filter effects and template objects.
SVG drawings can be interactive and dynamic. Animations can be defined and triggered either declaratively (i.e., by embedding SVG animation elements in SVG content) or via scripting.
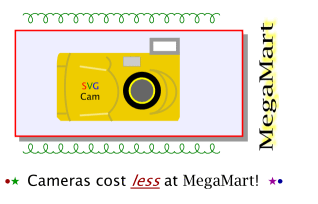
This article gives you all the basic information you need to start putting SVG to use. You'll learn enough to be able to make a handbill for a digital camera that's on sale at the fictitious MegaMart. (Any resemblance of this camera to a real product is slightly coincidental.)

|
Initialization
We want the handbill to be the size of a half sheet of U.S. letter paper. We specify
that
in the <svg> tag below. You should always include
<title> and <desc> elements. SVG display programs
use the title to display a tooltip, and the description is useful for search engines.
Additionally your document will be more easily accessible to visually impaired users.
<!DOCTYPE svg PUBLIC "-//W3C//DTD SVG 20001102//EN"

   "http://www.w3.org/TR/2000/CR-SVG-20001102/DTD/svg-20001102.dtd">


<svg width="21cm" height="13.5cm">

<title>MegaMall Handbill</title>

<desc>

    Handbill for the fictitious MegaMall

</desc>

    <!-- graphic specifications go here -->

</svg>
The DOCTYPE declaration above is not final yet because SVG is not a recommendation, although it is expected to gain that status soon.
When specifying width and height, you are actually establishing a
viewport in which your drawing will be displayed. You may use em,
ex, px, pt, pc, cm,
mm, or in to specify dimensions. If you don't use a measurement
unit, then the numbers are assumed to be pixels (px).
| Unit | Meaning |
|---|---|
em
|
a unit equal to the current font size |
ex
|
the x-height, usually the height of a lower case letter x |
px
|
pixels (the default) |
pt
|
points (one point = 1/72 inch) |
pc
|
picas (one pica = 1/6 inch) |
cm
|
centimeters |
mm
|
millimeters |
in
|
inches |
All numbers used to measure coordinates are assumed to be the same unit-type used
to
establish width and height. In our handbill, we'll set the width="21cm" and
height="13.5cm". In order to avoid having to use decimals for all of the
coordinates, we will establish a viewBox. A viewBox sets up a user coordinate
system which is mapped into the viewport bounds, stretching or shrinking a graphic
if the
viewBox and viewport aren't proportional. This stretching and shrinking happens only
if the
preserveAspectRatio is set to none (which is not the default).
In the following specification, we set up a system with ten "units" per centimeter.
<svg id="body" width="21cm" height="13.5cm"

    viewBox="0 0 210 135">
Adding Graphic Elements
Let's start off by adding the red-bordered rectangle with the light blue interior.
<svg id="body" width="21cm" height="13.5cm"

    viewBox="0 0 210 135">

<title>Example 1</title>

<desc>

    Rectangle with red border and light blue interior.

</desc>

 <rect x="10" y="20" width="150" height="70"

        fill="#eeeeff" stroke="red" stroke-width="1" />

</svg>
You specify a rectangle by giving the x and y coordinates of its
upper left corner and its width and height. When specifying
coordinates, the positive x direction is to the right, and the positive y
direction is downwards.
In this case, we've also set the fill color, stroke (line) color,
and stroke-width as separate attributes. It's also possible to set all these
properties, in a way similar to CSS, by way of a style attribute, an internal
style sheet, or an external style sheet. You can look at the SVG file for the style attribute or for the internal style sheet.
Here's the result, shown at half size:

|
If you'd like to try this yourself, download the Apache Software Foundation's Batik tool and install it according to its instructions. You will need a Java VM version 1.2 or greater. You can invoke the viewer tool with a simple UNIX command line like
# use path appropriate to where you've installed batik

java -jar /usr/local/xml-batik/batik/batik-svgviewer.jar
Transformations
Let's add the gray drop-shadow rectangle. We want it three units to the right and
below the
red rectangle. Rather than do the addition of the x and y
coordinates ourselves, we can specify that SVG should perform a transform on
the graphic; it should translate the rectangle by three units in both
dimensions. Here's the SVG, followed by the resulting image.
<svg id="body" width="21cm" height="13.5cm"

    viewBox="0 0 210 135">

<title>Example 2</title>

<desc>

    Rectangle with red border and light blue interior,

    with (intended) gray shadow rectangle.

</desc>

    <rect x="10" y="20" width="150" height="70"

        fill="#eeeeff" stroke="red" stroke-width="1" />


    <rect x="10" y="20" width="150" height="70"

        transform="translate(3, 3)"

        fill="#999999" stroke="#999999" stroke-width="1" />

</svg>

|
Not exactly what we had in mind. This demonstrates one of the rules of SVG: if object B is specified after object A in the source file, it appears above object A. We simply reverse the order in which the rectangles appear to get the desired result.
<svg id="body" width="21cm" height="13.5cm"

    viewBox="0 0 210 135">

<title>Example 3</title>

<desc>

    Rectangle with red border and light blue interior,

    with gray shadow rectangle.

</desc>

    <rect x="10" y="20" width="150" height="70"

        transform="translate(3, 3)"

        fill="#999999" stroke="#999999" stroke-width="1" />


    <rect x="10" y="20" width="150" height="70"

        fill="#eeeeff" stroke="red" stroke-width="1" />

</svg>

|
Reusing Graphics
![]() Next we'll put in the green loops above and below the rectangle. If you
look closely, you'll see that it's just one loop repeated over and over again. By
putting
the description of the single loop inside the
Next we'll put in the green loops above and below the rectangle. If you
look closely, you'll see that it's just one loop repeated over and over again. By
putting
the description of the single loop inside the <defs> element, you specify
that you are defining a graphic for later use, but do not want it displayed immediately.
So
you add this immediately after the </desc>. (Line numbers are shown for
reference only.)
 1 <defs>

 2  <polyline id="loop"

 3      points=

 4       1.00,  0.00     0.93,  0.16

 5       0.72,  0.26     0.43,  0.25

 6       0.13,  0.11    -0.11, -0.13

 7      -0.25, -0.43    -0.26, -0.72

 8      -0.16, -0.93     0.00, -1.00

 9       0.16, -0.93     0.26, -0.72

10       0.25, -0.43     0.11, -0.13

11      -0.13,  0.11    -0.43,  0.25

12      -0.72,  0.26    -0.93,  0.16

13      -1.00,  0.00"

14      transform="scale(5, 5)"

15      stroke="green" stroke-width="0.1" fill="none" />

16 </defs>
- Line 1
- Start “definitions” area.
- Line 2
- A
polylinedefines a set of connected straight line segments. Theidattribute gives the object a unique name by which you can refer to it. - Lines 3-13
- The
pointsattribute lists the (x, y) coordinate pairs for each point in the line segment. These points happen to be a graph of the polar equation r = 2cos(a) where a ranges from 0° to 180°, generated by this Java program. That's why the coordinates all range from -1 to 1 in the x and y directions. You may use commas and/or whitespace to separate coordinate values. - Line 14
- To make the loop large enough to see, we use the
scaletransformation to multiply coordinates by 5 in both the x and y directions. Important: all coordinates for this object are now scaled by a factor of five. - Line 15
- Specifies the line color to be green. Note that we have to set the stroke width to 0.1, because it, too, will be multiplied by five.
Then, after drawing the rectangles, you <use> the object that you
defined, translating it to the proper place on the canvas. The <use>
element's xlink:href will be the URI of the resource to use. It produces the
result shown below. See source code
<rect x="10" y="20" width="150" height="70"

    fill="#eeeeff" stroke="red" stroke-width="1" />


<use xlink:href="#loop" transform="translate(20,100)"/>

|
Grouping Objects
To make the series of loops below the rectangle, we use the <g>
element, which lets you group graphic objects together. While you may group together
any
objects you wish, and may nest groups to any depth you desire, in this case we'll
just group
together multiple <use>s of the loop we defined earlier.
Inside the <defs> element, add
<g id="multiloop">

    <use xlink:href="#loop"/>

    <use xlink:href="#loop" transform="translate(10, 0)"/>

    <use xlink:href="#loop" transform="translate(20, 0)"/>

    <use xlink:href="#loop" transform="translate(30, 0)"/>

    <use xlink:href="#loop" transform="translate(40, 0)"/>

    <use xlink:href="#loop" transform="translate(50, 0)"/>

    <use xlink:href="#loop" transform="translate(60, 0)"/>

    <use xlink:href="#loop" transform="translate(70, 0)"/>

    <use xlink:href="#loop" transform="translate(80, 0)"/>

    <use xlink:href="#loop" transform="translate(90, 0)"/>

    <use xlink:href="#loop" transform="translate(100, 0)"/>

    <use xlink:href="#loop" transform="translate(110, 0)"/>

    <use xlink:href="#loop" transform="translate(120, 0)"/>

</g>
Then, after the rectangle, replace the old <use> with one that refers
to multiloop, producing the result shown below. See source code
<use xlink:href="#multiloop" transform="translate(20, 100)"/>

|
Rotation
To put the upside-down loops at the top of the page, we'll need to use the
rotate transform, which comes in two versions.
-
rotate(angle) - Rotates the object by the specified angle in degrees, using the origin (0,0) as the center of rotation.
-
rotate(angle, cx, cy) - Rotates the object by the specified angle, using point (cx, cy) as the center of rotation
In many cases it's more convenient to use the second form of rotate,
especially if an object is not already centered around the origin, as the single loop
is. In
the case of the multiloop, its center point is (60,0). See the entire source.
<!-- loops at bottom -->

<use xlink:href="#multiloop" transform="translate(20, 100)"/>


<!-- loops at top -->

<use xlink:href="#multiloop"

    transform="translate(20, 10) rotate(180, 60, 0)"/>

|
Note that the angle specified in a rotate transformation is measured in
degrees, with positive numbers indicating a clockwise direction; 0 degrees is east,
90
degrees is south, etc.
Other Shapes and Paths
Adding the circular bullets to the handbill is easy; we use the
<circle> element, which has these atributes: cx, the
center x coordinate; cy, the center y coordinate; and
r, the radius. We'll add the circle to the <defs> section.
There's no scaling or color information; that leaves us free to change the color as
we like.
 <circle id="bullet" cx="0" cy="0"

r="1.5"/>
The other SVG shapes such as <rect>, <polyline>, and
<polygon> are shorthand for a more generic path object. A path
represents the outline of a shape which can be stroked (have its outline drawn) or
filled.
We could represent the star-shaped bullet as a <polygon>, but instead,
we'll represent it as a path.
The <path> element's main attribute is the d attribute.
The d stands for the path data. Path data consists of path command
letters and coordinate information. Some of the more important path command letters
are
listed in the following table.
| Letter | Meaning |
|---|---|
M
|
move to the following x,y coordinate |
L
|
Draw a line to the following x,y coordinate |
A
|
Draw an elliptical arc using the information that describes the x and y radius, x-axis rotation, direction and size of the arc's sweep, and the ending x, y coordinates of the arc. |
Z
|
Close the path; that is, return to the most recent Moveto point. |
SVG provides several shortcuts to minimize the amount of space needed to describe path. When you have a repeated command letter (for example, a series of lines or arcs), you don't have to repeat the letter. You also can eliminate any unnecessary whitespace. Thus, the following three paths describe the same parallelogram.
<path d="M 5,3 L 10,3 L 7,6 L 2,6 Z"/>

<path d="M 5,3 L 10,3  7,6  2,6 Z"/>

<path d="M5 3L10 3 7 6 2 6Z"/>
Upper-case letters indicate absolute coordinates; lower-case letters indicate coordinates relative to the previous coordinates.
Here's the non-minimized path for the star-shaped bullet.
<path id="star"

    d=

    "M -0.951,-0.309

     L  0.951,-0.309

       -0.588, 0.809

        0.000,-1.000

        0.588, 0.809

     Z"

     transform="scale(3,3)" stroke="none" />
And here are the references to them in the main SVG, along with the result. See the entire source.
<use xlink:href="#bullet" fill="#990000" transform="translate(5, 120)"/>

<use xlink:href="#star" fill="#009900" transform="translate(10, 120)"/>

<use xlink:href="#star" fill="#990099" transform="translate(180, 120)"/>

<use xlink:href="#bullet" fill="#000099" transform="translate(185, 120)"/>

|
SVG also provides command letters for cubic and quadratic Bézier curves, but they are beyond the scope of this article. The path for the camera (which you may see in the source) uses quadratic curves. Here's the result of the camera's path specifications:

|
For full information about paths, see the SVG specification.
Adding Text
The <text> element is a container element; the text you wish to display
is between the opening and closing tags. The most important attributes are the
x and y location for the text, the font-family,
font-size, and fill color.
If you need to change the attributes of a word or two somewhere in your text, you
should
use the <tspan> element rather than splitting your text into multiple
<text> elements. The camera body's text is grouped so that we don't
have to repeat the font-family and font-size on each text element.
<text font-family="sans-serif" font-size="10pt" fill="black"

    x="18" y="123">Cameras cost

    <tspan fill="#990000" font-style="italic"

        text-decoration="underline">less</tspan>

    at <tspan font-family="serif">MegaMart</tspan>!

</text>


<g font-family="sans-serif" font-size="6pt" fill="black">

    <text x="54" y="59">

    <tspan fill="red">S</tspan><tspan

        fill="green">V</tspan><tspan fill="blue">G</tspan>

    </text>

    <text x="53" y="66">Cam</text>

</g>
We'll also put some scaled, rotated text at the right side of the page. See the source.
<text font-family="serif" font-size="12pt" fill="black"

    x="0" y="0"

    transform="rotate(-90) translate(-100, 180) scale(1.5, 1)">

    MegaMart

</text>

|
Filters
The final task is to place the yellow glow behind the rotated text by using the SVG
<filter> element. The filter element allows you to apply one or more
filters, or graphic operations, to a graphic object. Unlike transforms, which change
an
object's size, shape, and orientation, filters usually affect an object's visual aspect.
SVG
has, among others, filters that blur an image, change its color saturation or
characteristics, add or overlap it with another object, produce a beveled or embossed
effect, and lighting effects.
Because we'll be using the MegaMart words twice, we'll put it into the
<defs> section:
<text id="megaText" fill="black" x="0" y="0"

  font-family="serif" font-size="12pt">

    MegaMart

</text>
To get the yellow glow from black text, you have to blur the image and change the resulting grayscale to yellow. It looks like this, with line numbers added for reference.
 1  <filter id="glowShadowFilter">

 2      <feGaussianBlur stdDeviation="0.7 0.7"/>

 3      <feColorMatrix

 4          type="matrix"

 5          values=

 6          "1 0 0 0 0

 7           0 1 0 0 0

 8           0 0 0 0 0

 9           0 0 0 1 0"/>

10      <feOffset dx="2" dy="2"/>

11  </filter>
- Line 1
- Start and name this filter sequence
- Line 2
- Do a Gaussian blur. The larger the standard deviation numbers are (for x and y directions), the more the image will blur.
- Lines 3-9
- This filter uses a matrix of values to determine how to change colors. Line 6, 7, 8, and 9 tell how to transform the red, green, blue,and alpha (transparency) channels of the image. Each of these lines gives the proportion of red, green, blue, and alpha to combine, plus an “offset” value. For example, line six says to take 100% of the red value, none of the green value, none of the blue value, and none of the alpha value for the current pixel. Add them all together, with no offset (that's the final zero in the line). That total becomes the new value for the red component of this pixel. In short, line six keeps the red component as it was, not adding anything else to it. Line seven keeps only the green component, line eight throws away the blue component entirely, and line nine keeps the transparency exactly as it was. The end result of all this is to change the image from grayscale to “yellow-scale.”
- Line 10
- This filter offsets an image by the specified
dxanddydistances. This would usually be in the middle of a filter sequence; here we use it to avoid having to do atransform=translate()later on.
Now, we group both text items, and filter the first one, which must appear before the second one so that it shows up underneath. Here's the SVG, and the final product. See the source.
<g transform="rotate(-90) translate(-100,180) scale(1.5,1)">

    <use xlink:href="#megaText" fill="whitw"

        filter="url(#glowShadowFilter)"/>

    <use xlink:href="#megaText"/>

</g>

|
Summary
In this brief introduction, you've learned how to
- set up the dimensions of an SVG drawing
- create basic shapes such as rectangles and circles
- transform a graphic by translating, scaling, and rotating it
- define graphics for later reuse
- group graphics
- use simple paths
- add text to a graphic
- use filters for visual effects
If you wish to learn more about the many things SVG can do, read the SVG specification.
